Build a Hello World Massa Station plugin
Welcome, Developer! You're about to embark on an exciting journey where you'll build your very first Massa Station plugin. If you're thrilled about the world of blockchain, smart contracts, and dApps, you've come to the right place!
As the most decentralized blockchain, Massa is a community-driven project. Thus, we tried to make as few assumptions as possible about the form and features that a module should have. As a result, Massa Station modules can be developed in any language, be more web2 or web3-oriented, and can be as simple or complex as you want them to be. In this tutorial, we are going to build the simplest of the programs; a "Hello, World!" Massa Station plugin.
If you don't know what are Massa Station and Massa Station Plugins, you can read this quick introduction here.
What are we going to do?
In this tutorial, we are going to develop a simple "Hello, World!" Massa Station plugin. This plugin will be composed of two parts: a back end and a front end. The back end will be a simple API that will allow Massa Station to interact with the plugin. The front end will be a simple web page that will be displayed when the plugin is called without any endpoint specified.
- Prerequisites: We will install the necessary tools to develop the plugin.
- Part 1: We will create an API server using go-swagger.
- Part 2: We will register our API server to Massa Station.
- Part 3: We will define our endpoint.
- Part 4: We will add a frontend to the plugin.
Prerequisites
Install Golang
Make sure that you have Golang installed on your machine. You can check if it is installed by running go version in your terminal. If you don't have Golang installed, you can follow the official installation guide. Make sure you add go to the PATH environment variable.
Install Go Swagger
Make sure you have Go Swagger installed on your machine. If you don't have Go Swagger installed, you can follow the official installation guide. Also, make sure that the folder containing the Go Swagger binary is added to the PATH environment variable. It's usually located in the default go workspace folder: $GOPATH/bin. Once installed, you can check if it is installed by running swagger version in your terminal.
Install Massa Station
Make sure that you have Massa Station installed on your machine. You can install it by downloading the installer on the official Massa Station website. Once downloaded, run the installer and let it guide you through the installation process.
If you can produce a similar output in your terminal, then you should be good to go:
❯ go version
go version go1.21.0 linux/amd64
❯ swagger version
version: v0.30.5
commit: (unknown, mod sum: "h1:SQ2+xSonWjjoEMOV5tcOnZJVlfyUfCBhGQGArS1b9+U=")
❯ massastation
2023-08-22T15:28:25.058+0200  INFO  logger/global.go:51 Connected to node server https://buildnet.massa.net/api/v2 (version DEVN.24.1)
2023-08-22T15:28:25.060+0200  INFO  logger/global.go:62 Serving massastation at http://[::]:80
2023-08-22T15:28:25.061+0200  INFO  logger/global.go:62 Serving massastation at https://[::]:443
Setting up the project and creating the plugin's API.
Initialize the project
Navigate to your favorite folder and create a new folder for your project. In this tutorial, we will name it my-plugin. Navigate to the my-plugin folder and initialize it as a go module by running the following command:
go mod init my-plugin
This will create a go.mod file in the my-plugin folder.
Define the server stub configuration
Now, let's create the server stub. To do so, we will use the go-swagger tool. Go Swagger allows you to generate a server stub from a swagger file. The server stub will contain the API's endpoints and the necessary code to run the server.
So go ahead and create an api folder in the my-plugin folder.
Then, create a swagger.yml file in the my-plugin/api folder. This file will contain the server specification. Add the following configuration to the swagger.yml file:
consumes:
  - application/json
info:
  description: Hello world plugin API.
  title: hello-world-plugin
  version: 0.0.0
produces:
  - application/json
schemes:
  - http
swagger: "2.0"
paths:
  /:
    get:
      operationId: defaultPage
      responses:
        "301":
          description: Move to the default endpoint
Now we are going to need a target directory to store the generated server stub.
So go ahead and in the my-plugin/api folder, create a new folder named server.
Navigate back to the root directory my-plugin and create a generate.go file. This file will contain the command that generates the server stub from the swagger file when you run go generate ./....
Add the following code to generate.go:
package main

//go:generate swagger generate server --quiet --target api/server --name my-plugin --spec api/swagger.yml --exclude-main
Here we are using the swagger generate server command to generate the server stub. The --target flag is used to specify the target directory. The --name flag is used to specify the name of the server. The --spec flag is used to specify the swagger file. The --exclude-main flag is used to exclude the main function from the generated code. We will add our own main function later on.
Generate the server stub
Now that we have defined the server configuration, we can generate the server stub. To do so, run the following command in the root directory my-plugin:
go generate ./...
This will generate the server stub in the my-plugin/api/server folder. At this point, you should have the following folder structure:
my-plugin
├── generate.go
├── go.mod
├── api
│   ├── swagger.yml
│   ├── server
│   │   ├── restapi
│   │   │   ├── server.go
│   │   │   ├── configure_my-plugin.go
│   │   │   ├── doc.go
│   │   │   ├── embedded_spec.go
│   │   │   ├── operations
│   │   │   │   ├── default_page.go
│   │   │   │   ├── default_page_parameters.go
│   │   │   │   ├── default_page_responses.go
│   │   │   │   ├── default_page_urlbuilder.go
│   │   │   │   ├── my_plugin_api.go
Once you are done generating the server stub, we are going to need to edit one of the generated file. Indeed, the default CORS setting will block requests between Massa Station plugins. But as requests between Massa Station plugins are local, there is no risk with allowing CORS.
So go ahead and open the my-plugin/api/server/restapi/configure_my-plugin.go file.
Delete the current setupGlobalMiddleware function and replace it with the following code:
func setupGlobalMiddleware(handler http.Handler) http.Handler {
    handleCORS := cors.New(cors.Options{}).Handler

    return handleCORS(handler)
}
At the beginning of the file, you should see the following comment:
// This file is safe to edit. Once it exists it will not be overwritten
This comment indicates that the file will not be overwritten when you re-generate the server stub. So you shouldn't have to edit it again when regenerating the server stub.
We will also need to install the cors package with the following command:
go get github.com/rs/cors
Then we will need to import it in the my-plugin/api/server/restapi/configure_my-plugin.go file. So go ahead and open the configure_my-plugin.go file and add the following line to the imports section:
"github.com/rs/cors"
Create the logic of the API
Create my-plugin.go in the root of your project and add the following code that implements the API's logic:
package main

import (
  "fmt"
  "os"
  "os/signal"
  "syscall"
  "time"

  "my-plugin/api/server/restapi"
  "my-plugin/api/server/restapi/operations"

  "github.com/go-openapi/loads"
)
func killTime(quit chan bool) {
    // creates a ticker that will send a message every 5 seconds
    ticker := time.NewTicker(5 * time.Second) //nolint:gomnd

    fmt.Fprintf(os.Stdout, "Plugin is initializing.\n")

    for {
        select {
        case <-ticker.C:
            fmt.Fprintf(os.Stdout, "Tic!\n") // logs a message every 5 seconds
        case <-quit:
            fmt.Fprintf(os.Stdout, "Plugin is shutting down.\nBye!\n") // logs a message when the plugin is shutting down

            return
        }
    }
}

func initializeAPI() *restapi.Server {
    swaggerSpec, err := loads.Analyzed(restapi.SwaggerJSON, "") // loads the swagger file
    if err != nil {
        panic(err)
    }

    pluginAPI := operations.NewMyPluginAPI(swaggerSpec) // initializes the API
    server := restapi.NewServer(pluginAPI) // creates the server

    server.ConfigureAPI() // configures the API

    return server
}

func main() {
    quit := make(chan bool) // creates a channel to receive the interrupt signal
    intSig := make(chan os.Signal, 1) // notifies the channel when the interrupt signal is received
    signal.Notify(intSig, syscall.SIGINT, syscall.SIGTERM)

    go killTime(quit) // starts the killTime function in a goroutine

    server := initializeAPI() // initializes the API

    if err := server.Serve(); err != nil {
        panic(err)
    }

    <-intSig
    quit <- true
}
The killTime function logs a message every 5 seconds. It is used to show that the plugin is running.
The initializeAPI function initializes the API and returns the server.
Once you have created the my-plugin.go file, and copied the code, we are going to install the imported packages. To do so, run the following command in the root directory my-plugin:
go mod tidy
Test the API
Once you are done editing the my-plugin.go file, you should be able to test the API by running:
go run ./my-plugin.go
After five seconds, you should get a similar output:
❯ go run ./my-plugin.go
Plugin is initializing.
2023/08/22 15:04:39 Serving my plugin at http://[::]:39725
Tic!
The last numbers correspond to the port the API is running on. It will change each time you restart the plugin.
At this stage, we are running the API in standalone mode. In the next section, we will register the API with Massa Station, to make it run through Massa Station.
Register to Massa Station
Install the Massa Station plugin-kit module
To be able to register the plugin with Massa Station, we need to install the plugin-kit go module.
The plugin-kit module provides useful features to develop Massa Station plugins in golang.
Here, we are going to use the RegisterPlugin function that allows us to register the plugin to Massa Station.
Install the following package:
go get github.com/massalabs/station/plugin-kit
This package will be imported to my-plugin.go file. So go ahead and add the following line to the imports section of my-plugin.go:
"github.com/massalabs/station/plugin-kit"
The import section of your my-plugin.go file should look like this:
import (
  "fmt"
  "net/http"
  "os"
  "os/signal"
  "syscall"
  "time"

  "my-plugin/api/server/restapi"
  "my-plugin/api/server/restapi/operations"

  "github.com/go-openapi/loads"
  "github.com/rs/cors"

  pluginKit "github.com/massalabs/station/plugin-kit"
)
Once this is done, we will add the registration logic to our main function. We want to add the following lines to the main function:
  listener, err := server.HTTPListener()
  if err != nil {
    panic(err)
  }

  pluginKit.RegisterPlugin(listener) // registers the plugin
They should be added right after the server := initializeAPI() line. In the end, your main function should look like this:
func main() {
    quit := make(chan bool) // creates a channel to receive the interrupt signal
    intSig := make(chan os.Signal, 1) // notifies the channel when the interrupt signal is received
    signal.Notify(intSig, syscall.SIGINT, syscall.SIGTERM)

    go killTime(quit) // starts the killTime function in a goroutine

    server := initializeAPI() // initializes the API

    listener, err := server.HTTPListener()
    if err != nil {
        panic(err)
    }

    err = pluginKit.RegisterPlugin(listener) // registers the plugin
    if err != nil {
        panic(err)
    }

    if err := server.Serve(); err != nil {
        panic(err)
    }

    <-intSig
    quit <- true
}
pluginKit.RegisterPlugin is a function available in the plugin-kit module.
It facilitates the registration of a plugin with Massa Station, assigning a unique correlation ID to the plugin for identification purposes within the Massa Station system.
Build the plugin binary and move it to the Massa Station plugin folder
Now that we have implemented the logic to register the plugin with Massa Station, we are going to build the plugin binary, and move it to the Massa Station plugin folder. By doing so, we will make the binary available to Massa Station.
So, go ahead and build a binary of the plugin with the following command:
mkdir build && go build -o build/my-plugin
In addition to the binary, Massa Station needs a manifest file to be able to identify the plugin. So go ahead and create a manifest.json file in the root directory my-plugin. Add the following configuration to the manifest.json file:
{
  "author": "Your name",
  "name": "Hello World",
  "description": "Hello world plugin",
  "logo": "hello_world.svg",
  "home": "",
  "version": "0.0.1"
}
Feel free to edit the manifest.json file to match your name and the name of the plugin.
As you can see, we referenced a .svg file. This file will be the logo of your plugin, that will appear on the Massa Station modules page. So go ahead and create a web folder in the root directory my-plugin. Then, create a content folder in the my-plugin/web folder. Finally, add the hello_world.svg file that you can download here to the my-plugin/web/content folder.
Finally, move the plugin binary, the manifest, and the .svg file to the Massa Station plugin folder. The location of the Massa Station plugin folder depends on your operating system:
On linux or macOS you can use the following command to move the files:
mkdir -p /usr/local/share/massastation/plugins/my-plugin
cp build/my-plugin /usr/local/share/massastation/plugins/my-plugin
cp web/content/hello_world.svg /usr/local/share/massastation/plugins/my-plugin
cp manifest.json /usr/local/share/massastation/plugins/my-plugin
On Windows, you can use the following command in the PowerShell:
# Create the directory
$destinationDir = "C:\Program Files (x86)\MassaStation\plugins\my-plugin"
New-Item -ItemType Directory -Force -Path $destinationDir

# Copy the files
$sourceDir = "build\my-plugin"
Copy-Item $sourceDir\my-plugin $destinationDir -Force

$sourceDir = "web\content"
Copy-Item $sourceDir\hello_world.svg $destinationDir -Force

Copy-Item manifest.json $destinationDir -Force
Restart Massa Station and access the module page
Restart Massa Station and access the module page. You should see the plugin in the list of available plugins.
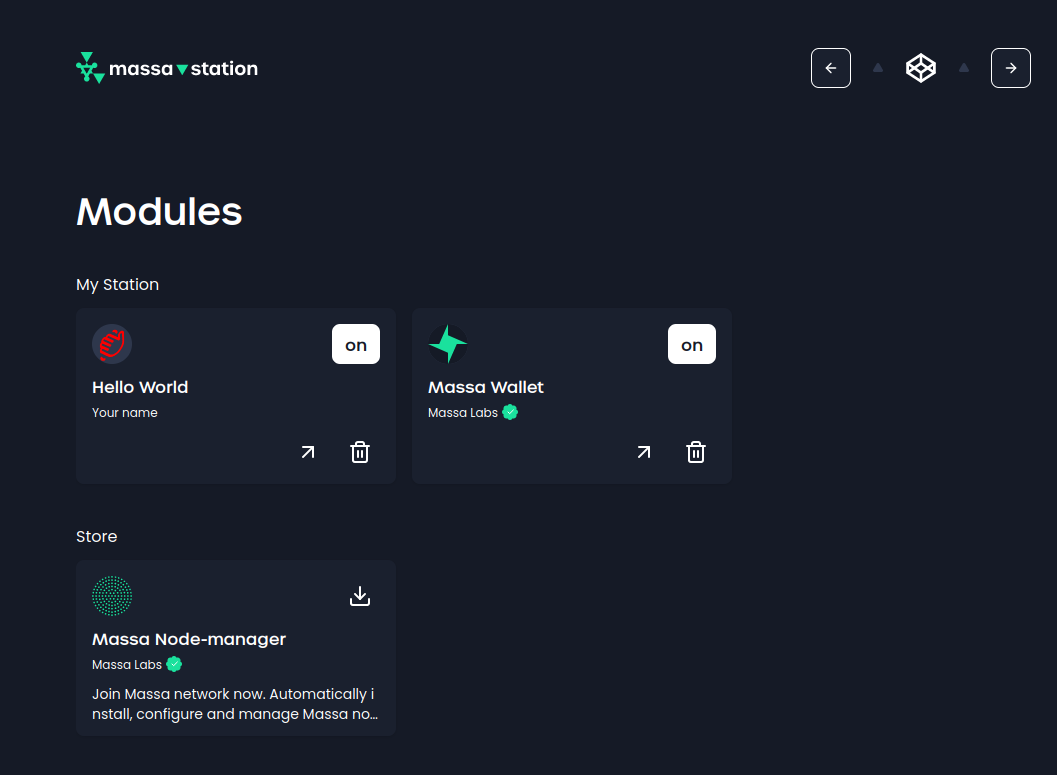
For now, we cannot access it because we haven't implemented any endpoint. So let's do that in the next section.
Define your endpoint
We are going to add a new endpoint to our plugin that will display a message when called. To do so, we will add a new endpoint to the swagger file, generate the code, add a handler, and register the handler.
Add a new endpoint to the swagger file
So go ahead and open the swagger.yml file in the api folder, and append the following code at the end of the file:
  /api/hello:
    put:
      operationId: hello
      parameters:
        - in: query
          name: name
          type: string
          description: the name of the person to be greeted.
      produces:
        - application/json
      responses:
        "200":
          description: Greeting content.
          schema:
            type: object
            required:
              - message
            properties:
              message:
                description: Greeting message.
                type: string
                x-nullable: false
        "500":
          description: Internal Server Error - The server has encountered a situation it does not know how to handle.
Generate the server stub
Once you are done editing the swagger.yml file, we are going to re-generate the server stub based on the new configuration. To do so, run the following command in the root directory my-plugin:
go generate ./...
Add a handler
Now we are going to add a handler for our new endpoint. To do so, we will create an endpoints.go file that will contain the logic of the handler.
So go ahead and create the file endpoints.go in the my-plugin/api folder.
Add the following code to the endpoints.go file:
package api

import (
  "fmt"

  "my-plugin/api/server/restapi/operations"

  "github.com/go-openapi/runtime/middleware"
)

func Hello(params operations.HelloParams) middleware.Responder {
  target := "World"
  if params.Name != nil {
    target = *params.Name
  }

  return operations.NewHelloOK().WithPayload(
    &operations.HelloOKBody{Message: fmt.Sprintf("Hello, %s!", target)},
  )
}
Here, we are simply returning a 200 OK response with a greeting message that takes the name of the person to be greeted from the query parameters.
Register the handler
Now we are going to set the handler for our newly created hello endpoint. To do so, we will add the following line to the initializeAPI function in the my-plugin.go file:
pluginAPI.HelloHandler = operations.HelloHandlerFunc(api.Hello)
So go ahead and in the my-plugin.go file, replace the current initializeAPI function with the following code snippet:
func initializeAPI() *restapi.Server {
  swaggerSpec, err := loads.Analyzed(restapi.SwaggerJSON, "") // loads the swagger file
  if err != nil {
      panic(err)
  }

  pluginAPI := operations.NewMyPluginAPI(swaggerSpec) // initializes the API
  server := restapi.NewServer(pluginAPI) // creates the server
  server.ConfigureAPI() // configures the API
  pluginAPI.HelloHandler = operations.HelloHandlerFunc(api.Hello) // sets the handler for the Hello endpoint

  return server
}
Re-build and re-deploy the plugin
Now that we have created our endpoint and the corresponding handler, we need to re-build and re-deploy the plugin. We are going to follow the same steps 2 and 3 of the previous section. Start by building the binary with the following command:
go build -o build/my-plugin
Then, move the binary, to the Massa Station plugin folder. The location of the Massa Station plugin folder depends on your operating system.
On linux or macOS:
cp build/my-plugin /usr/local/share/massastation/plugins/my-plugin
On Windows, you can use the following commands in the PowerShell:
# Copy the files
$sourceDir = "build\my-plugin"
Copy-Item $sourceDir\my-plugin $destinationDir -Force
Test the endpoint
We are going to test the endpoint by calling it with curl. The url of the endpoint will vary depending on the naming you used in the previous steps. So the easiest way will be to go to the Massa Station module page, locate your plugin, launch it and copy the url.
In my case, it is: https://station.massa/plugin/your-name/hello-world/.
Run the following command to test the hello endpoint we implemented, and don't forget to replace the url with yours:
curl -X PUT "<INSERT YOUR PLUGIN URL>api/hello?name=John" -H "accept: application/json""
You should see the following output:
{ "message": "Hello, John!" }
Great! We have successfully added a new endpoint to our plugin.
The next step will be to add a frontend to our plugin.
Add a frontend to the plugin
We are going to add a frontend to our plugin. The process is quite similar to the one we followed in the previous section.
We will add a new endpoint to the swagger file, generate the code, add a handler, and register the handler. Then, we will create a basic HTML page and add the handler to the initializeAPI function.
Add a new endpoint to the swagger file
Once again, we will add a new endpoint to the API. This time, we will add an endpoint that will allow us to serve a static website. To do so, we will add a new endpoint to the swagger file. So go ahead and open the swagger.yml file in the api folder, and append the following code at the end of the file:
  /web/{resource}:
    get:
      operationId: web
      produces:
        - application/json
        - text/javascript
        - text/html
        - text/css
        - text/webp
        - image/png
      parameters:
        - in: path
          name: resource
          type: string
          required: true
          description: Website resource.
      responses:
        "200":
          description: Page found
        "404":
          description: Resource not found.
Generate the server stub
Once you are done editing the swagger.yml file, we are going to re-generate the server stub based on the new configuration. To do so, run the following command in the root directory my-plugin:
go generate ./...
Create an HTML page
Now we are going to create a basic HTML page that will be served by the plugin. So go ahead and create an index.html file in the my-plugin/web/content folder.
Add the following code to the index.html file:
  <html>
    <body>
      <h1>Hello, world!</h1>
    </body>
  </html>
Add the html parser
We are going to create a handler that will read the content of the html file and return it. So go ahead and create a resources.go file in the my-plugin/web folder.
Add the following code to the my-plugin/web/resources.go file:
package web

import (
  "embed"
  "fmt"
)

const basePath = "content/"

//go:embed content
var content embed.FS

func Content(resource string) ([]byte, error) {
  content, err := content.ReadFile(basePath + resource)
  if err != nil {
    return nil, fmt.Errorf("while reading %s in %s: %w", resource, basePath, err)
  }

  return content, nil
}
Add a handler
We are also going to create an endpoints.go file that will contain the logic of the handler. It will point Massa Station to the right resource.
So go ahead and create the file endpoints.go in the my-plugin/web folder and add the following code:
package web

import (
  "mime"
  "net/http"
  "path/filepath"

  "github.com/go-openapi/runtime/middleware"
  "my-plugin/api/server/restapi/operations"
  "github.com/massalabs/station-massa-wallet/pkg/openapi"
)

// webHandle  handles a Web request.
func Handle(params operations.WebParams) middleware.Responder {
  resourceName := params.Resource

  resourceContent, err := Content(resourceName) // reads the content of the html file
  if err != nil {
    return operations.NewWebNotFound()
  }

  fileExtension := filepath.Ext(resourceName)

  mimeType := mime.TypeByExtension(fileExtension) // gets the mime type of the file

  header := map[string]string{"Content-Type": mimeType}

  return openapi.NewCustomResponder(resourceContent, header, http.StatusOK) // returns the content of the html file
}

// defaultRedirectHandler redirects request to "/" URL to "web/index.html".
func DefaultRedirectHandler(_ operations.DefaultPageParams) middleware.Responder {
  return openapi.NewCustomResponder(nil, map[string]string{"Location": "web/index.html"}, http.StatusPermanentRedirect) // redirects to the html file
}
As you can see, we imported the github.com/massalabs/station-massa-wallet/pkg/openapi package. This package contains the NewCustomResponder function that allows us to return a custom response.
Go ahead and install the package with the following command:
go get github.com/massalabs/station-massa-wallet/pkg/openapi
Register the handler
Then, we need to add the handler to the initializeAPI function:
    ...
  pluginAPI.WebHandler = operations.WebHandlerFunc(web.Handle)
  pluginAPI.DefaultPageHandler = operations.DefaultPageHandlerFunc(web.DefaultRedirectHandler)
    ...
So open the my-plugin.go file and replace the current content of the initializeAPI function with the following code snippet:
func initializeAPI() *restapi.Server {
  swaggerSpec, err := loads.Analyzed(restapi.SwaggerJSON, "")
  if err != nil {
    panic(err)
  }

  pluginAPI := operations.NewHelloWorldAPI(swaggerSpec)
  server := restapi.NewServer(pluginAPI)

  pluginAPI.WebHandler = operations.WebHandlerFunc(web.Handle)
  pluginAPI.DefaultPageHandler = operations.DefaultPageHandlerFunc(web.DefaultRedirectHandler)
  pluginAPI.HelloHandler = operations.HelloHandlerFunc(api.Hello)

  server.ConfigureAPI()

  return server
}
As you can see, we are using the web package we created in the previous step. So make sure you import it in the my-plugin.go file. Your import section should look like this:
import (
  "fmt"
  "net/http"
  "os"
  "os/signal"
  "syscall"
  "time"

  "my-plugin/api"
  "my-plugin/api/server/restapi"
  "my-plugin/api/server/restapi/operations"
  "my-plugin/web"

  "github.com/go-openapi/loads"
  "github.com/rs/cors"

  pluginKit "github.com/massalabs/station/plugin-kit"
)
Re-build and re-deploy the plugin
As we already did in the previous sections, we are going to re-build and re-deploy the plugin. Start by building the binary with the following command:
go build -o build/my-plugin
Then, move the binary, to the Massa Station plugin folder. The location of the Massa Station plugin folder depends on your operating system.
To copy the files, you should make sure that Massa Station is not running.
On linux or macOS:
cp build/my-plugin /usr/local/share/massastation/plugins/my-plugin
cp web/content/index.html /usr/local/share/massastation/plugins/my-plugin
On Windows, you can use the following commands in the PowerShell:
# Copy the files
$sourceDir = "build\my-plugin"
Copy-Item $sourceDir\my-plugin $destinationDir -Force

$sourceDir = "web\content"
Copy-Item $sourceDir\index.html $destinationDir -Force
Restart Massa Station and access the module page
Restart Massa Station and access the module page. You should see the plugin in the list of available plugins. Click on the plugin to launch it. You should see the "Hello, World!" page.

Congratulations! You have successfully created your first Massa Station plugin!